1. 同步容器 1.1 同步容器
1.2 同步容器中出现的问题 同步容器都是线程安全的。但是对于复合操作,可能需要使用额外的客户端加锁进行保护。
通常对容器的复合操作包括:
迭代
导航(根据一定的顺序寻找下一个元素)
条件运算(缺少即加入……)
操作 Vector 的复合操作可能导致混乱结果:
1 2 3 4 5 6 7 8 9 10 11 12 13 14 15 16 import java.util.Vector;public class UnsafeVectorHelpers { public static Object getLast (Vector list) { int lastIndex = list.size() - 1 ; return list.get(lastIndex); } public static void deleteLast (Vector list) { int lastIndex = list.size() - 1 ; list.remove(lastIndex); } }
对于 list.get()、list.remove()和list.size() 其本身是线程安全的:
1 2 3 4 5 6 7 8 9 10 11 12 13 14 15 16 17 18 19 20 21 22 23 24 25 26 27 28 29 30 31 32 33 34 35 36 37 38 39 40 41 42 43 44 45 46 47 48 49 50 public synchronized E get (int index) { if (index >= elementCount) throw new ArrayIndexOutOfBoundsException (index); return elementData(index); } public synchronized E remove (int index) { modCount++; if (index >= elementCount) throw new ArrayIndexOutOfBoundsException (index); E oldValue = elementData(index); int numMoved = elementCount - index - 1 ; if (numMoved > 0 ) System.arraycopy(elementData, index+1 , elementData, index, numMoved); elementData[--elementCount] = null ; return oldValue; } public synchronized int size () { return elementCount; }
但是对于 getLast() 和 deleteLast() 则不然。
1 2 3 4 5 6 7 8 9 1. 假如两个线程分别调用 getLast() 和 deleteLast() 方法 2. 它们先后获取到的 lastIndex 都是 10 3. 调用 deleteLast() 的线程先按照 lastIndex=10 删除了 Vector 的最后一个元素 4. 另一个调用 getLast() 的线程此时按照 lastIndex=10 获取 Vector 的一个元素(元素已经被删除了) 5. 抛出异常:ArrayIndexOutOfBoundsException(index)
使用客户端加锁,对 Vector 进行复合操作:
1 2 3 4 5 6 7 8 9 10 11 12 13 14 15 16 17 18 19 20 21 22 23 24 25 26 27 import java.util.Vector;public class SafeVectorHelpers { private final Vector list; public SafeVectorHelpers (Vector list) { this .list = list; } public Object getLast () { synchronized (list) { int lastIndex = list.size() - 1 ; return list.get(lastIndex); } } public void deleteLast () { synchronized (list) { int lastIndex = list.size() - 1 ; list.remove(lastIndex); } } }
迭代中可能抛出 ArrayIndexOutOfBoundsException:
1 2 3 for (int i=0 ; i<vector.size(); i++) { doSomething(vector.get(i)); }
某个线程在操作 vector 的同时,并不能阻止别的线程对其进行操作,假如在迭代的过程中,其它线程操作删除了 vector 里面的一个元素,那么就会抛出 ArrayIndexOutOfBoundsException
使用客户端加锁进行迭代:
1 2 3 4 5 synchronized (vector) { for (int i=0 ; i<vector.size(); i++) { doSomething(vector.get(i)); } }
这样会削弱并发性。在迭代的时候,其它线程并不能访问 vector
1.3 迭代器和 ConcurrentModificationException 对 Collection 进行迭代的标准方式是使用 Iterator。在迭代过程中,对 Collection 进行了修改操作,会导致抛出 ConcurrentModificationException 异常。
1 2 3 4 5 List<Object> widgetList = Collections.synchronizedList(new ArrayList <>()); for (Object obj : widgetList) { doSomething(obj); }
上面说到 客户端加锁进行迭代 会影响并发性能。
在迭代期间,对容器加锁的一个替代办法是复制容器。
因为复制是线程限制的,没有其他的线程能够在迭代期间对其进行修改,这样消除了ConcurrentModificationException 发生的可能性。(**容器仍然需要在复制期间对自己加锁**)。
复制容器会有明显的性能开销:这样做是好是坏取决于许多因素,包括容器的大小、每一个元素的工作量、迭代操作相对于容器其他操作的频率,以及响应性和吞吐量的
1.4 隐藏迭代器 迭代器加锁和复制容器可以防止迭代器抛出ConcurrentModificationException异常。所有对共享容器进行迭代的地方都需要此操作。
在某些情况下,迭代器是隐藏起来的。如:
1 2 3 4 5 6 7 8 9 10 11 12 13 14 15 16 17 18 19 20 21 22 23 24 25 26 27 import java.util.HashSet;import java.util.Random;import java.util.Set;public class HiddenIterator { private final Set<Integer> set = new HashSet <>(); public synchronized void add (Integer i) { set.add(i); } public synchronized void remove (Integer i) { set.remove(i); } public void addTenThings () { Random random = new Random (); for (int i=0 ; i < 10 ; i++) { add(random.nextInt()); } System.out.println("DEBUG: 添加了十个元素 " + set); } }
在如下代码中将执行迭代操作:
1 System.out.println("DEBUG: 添加了十个元素 " + set);
编译器将字符串的连接操作转换为StringBuilder.append(Object),而这个方法又会调用容器 的AbstractCollection.toString()方法:
1 2 3 4 5 6 7 8 9 10 11 12 13 14 15 16 17 18 19 20 21 22 23 24 25 public String toString () { Iterator<E> it = iterator(); if (! it.hasNext()) return "[]" ; StringBuilder sb = new StringBuilder (); sb.append('[' ); for (;;) { E e = it.next(); sb.append(e == this ? "(this Collection)" : e); if (! it.hasNext()) return sb.append(']' ).toString(); sb.append(',' ).append(' ' ); } }
addTenThings()方法可能会抛出ConcurrentModificationException,因为在生成调试消息的过程中,AbstractCollection.toString()对容器进行迭代。
2. 并发容器 2.1 并发容器 Java5.0开始针对多线程并发访问设计,提供了并发性能较好的并发容器,引入了java.util.concurrent包。主要解决了两个问题:
根据具体场景进行设计,尽量避免synchronized,提供并发性。
定义了一些并发安全的复合操作,并且保证并发环境下的迭代操作不会出错。
2.2 ConcurrentHashMap
ConcurrentHashMap为了提高本身的并发能力,在内部采用了一个叫做Segment的结构,一个Segment其实就是一个类HashTable的结构,Segment内部维护了一个链表数组ConcurrentHashMap定位一个元素的过程需要进行两次Hash操作,第一次Hash定位到Segment,第二次Hash定位到**元素所在链表的头部**
该结构的带来的副作用是Hash的过程要比普通的HashMap要长,但是带来的好处是写操作的时候可以只对元素所在的Segment进行加锁即可,不会影响到其他的Segment
ConcurrentHashMap让锁的粒度更精细一些,并发性能更好。
构造方法如下:
1 2 3 4 5 6 7 8 9 10 11 12 13 public ConcurrentHashMap (int initialCapacity, float loadFactor, int concurrencyLevel) {}public ConcurrentHashMap (int initialCapacity, float loadFactor) {}public ConcurrentHashMap (Map<? extends K, ? extends V> m) {}public ConcurrentHashMap () {}
2.3 Map附加的原子操作 因为 ConcurrentHashMap 不能够在独占访问中被加锁,我们不能使用客户端加锁来创建新的原子操作。
不过一些常见的复合操作,比如缺少即加入,相等便移除和相等便替换,都已被实现为原子操作。
并且这些操作已在 ConcurrentMap 接口中声明,如下所示:
1 2 3 4 5 6 7 8 9 10 11 12 13 public interface ConcurrentMap <K,V> extends Map <K, V> { V putIfAbsent (K key, V value) ; boolean remove (K key, V value) ; boolean replace (K key, V oldvalue, V newValue) ; V replace (K key, V newValue) ; }
2.4 CopyOnWrite 容器 CopyOnWrite 通俗的理解是当我们往一个容器添加元素的时候,不直接往当前容器添加,而是先将当前容器进行Copy,复制出一个新的容器,然后新的容器里添加元素,添加完元素之后,再将原容器的引用指向新的容器。
优点:
CopyOnWrite容器 是一种读写分离的思想,读和写不同的容器。这种读写分离的思想,对于并发的读更友好。
不足:
CopyOnWrite容器 写时复制机制,导致在进行写操作的时候,内存里会同时驻扎两个对象的内存,旧的对象和新写入的对象。如果这些对象占用的内存比较大,那么这个时候很有可能造成频繁的Yong GC和Full GC
CopyOnWrite容器 只能保证数据的最终一致性,不能保证数据的实时一致性。
3. 阻塞队列和生产者-消费者模式 3.1 阻塞队列和生产者-消费者模式 阻塞队列
阻寨队列(Blocking queue)提供了可阻塞的 put 和 take 方法
如果 Queue 己经满了,put 方法会被阻塞,直到有空间可用
如果 Queue是空的,那么 take 方法会被阻塞,直到有元素可用
Queue 的长度可以有限,也可以无限,无限的 Queue 永远不会充满,所以它的 put 方法永远不会阻塞
例如:A洗盘子,并把洗好的盘子放在盘子架上,B从架子上得到盘子,并把它烘干。
1 2 3 4 5 1. 在这个场景中,盘子架充当了阻寨队列 2. 如果架子上没有盘子,消费者会一直等待,直到有盘子需要烘干 3. 如果架子被放满了,生产者会停止清洗直到架子上拥有新空间 每一个工人只与盘子架产生互动。他们不需要知道究竟存在多少生产者和消费者,或者谁生产了某个给定工作条目。
3.2 常见的阻塞队列 1 2 3 4 5 6 7 8 9 public class ArrayBlockingQueue <E> {} public class LinkedBlockingQueue <E> {} public class PriorityBlockingQueue <E> {} public class DelayQueue <E extends Delayed >{} public class SynchronousQueue <E> {}
3.3 阻塞队列常见的方法 1 2 3 4 5 6 7 8 9 add(E e) 将元素e插入到队列末尾,成功返回 true;失败 抛出异常 remove() 移除队首元素,成功返回 true;失败 抛出异常 poll() 移除并获取队首元素,若成功 返回队首元素;否则 返回null peek() 获取队首元素,若成功 返回队首元素;否则 返回null take() 获取并移除队首元素,如果队列为空则阻塞直到队列中有元素 put() 向队尾添加元素,如果队列满则等待直到可以添加 offer(E e) 向队尾添加元素,成功返回true;失败返回false
3.4 连续的线程限制 一个线程约束的对象完全由单一线程所有,但是所有权可以通过安全的发布被转移
安全发布确保了对象状态对新的所有者是可见的,并且因为原始的所有者不会再触及它,这样使得对象完全受限于新线程中
对于可变对象,生产者-消费者设计和阻塞队列一起,为生产者和消费者之间移交对象所有权提供了连续的线程限制
桌面搜索应用程序中的生产者和消费者
1 2 3 4 5 6 7 8 9 10 11 12 13 14 15 16 17 18 19 20 21 22 23 24 25 26 27 28 29 30 31 32 33 34 35 36 37 38 39 40 41 42 43 44 45 46 47 48 49 50 51 52 53 54 55 56 57 58 59 60 61 62 63 64 65 66 67 68 69 70 71 72 73 74 75 76 77 78 79 80 81 82 83 84 85 86 87 88 89 90 91 92 93 94 95 96 97 98 99 100 101 102 103 104 105 106 107 108 109 110 111 112 113 114 115 116 117 118 119 120 121 122 123 124 125 126 127 128 129 130 131 132 133 134 135 136 137 138 139 140 import java.io.File;import java.io.FileFilter;import java.util.concurrent.BlockingQueue;import java.util.concurrent.LinkedBlockingQueue;public class ProducerConsumer { static class FileCrawler implements Runnable { private final BlockingQueue<File> fileQueue; private final FileFilter fileFilter; private final File root; public FileCrawler (BlockingQueue<File> fileQueue, final FileFilter fileFilter, File root) { this .fileQueue = fileQueue; this .root = root; this .fileFilter = new FileFilter () { @Override public boolean accept (File pathname) { return pathname.isDirectory() || fileFilter.accept(pathname); } }; } private boolean alreadyIndexed (File file) { return false ; } @Override public void run () { try { crawl(root); } catch (InterruptedException e) { Thread.currentThread().interrupt(); } } private void crawl (File root) throws InterruptedException { File[] entries = root.listFiles(fileFilter); if (entries != null ) { for (File entry : entries) { if (entry.isDirectory()) { crawl(entry); } else if (!alreadyIndexed(entry)) { fileQueue.put(entry); } } } } } static class Indexer implements Runnable { private final BlockingQueue<File> queue; public Indexer (BlockingQueue<File> queue) { this .queue = queue; } @Override public void run () { try { while (true ) { indexFile(queue.take()); } } catch (InterruptedException e) { Thread.currentThread().interrupt(); } } public void indexFile (File file) { }; } private static final int BOUND = 10 ; private static final int N_CONSUMERS = Runtime.getRuntime().availableProcessors(); public static void startIndexing (File[] roots) { BlockingQueue<File> queue = new LinkedBlockingQueue <File>(BOUND); FileFilter filter = new FileFilter () { @Override public boolean accept (File pathname) { return true ; } }; for (File root : roots) { new Thread (new FileCrawler (queue, filter, root)).start(); } for (int i = 0 ; i < N_CONSUMERS; i++) { new Thread (new Indexer (queue)).start(); } } }
3.5 双端队列 Deque 和 BlockingDeque,它们分别扩展了 Queue 和 BlockingQueve。
Deque 是一个双端队列,允许高效地在头和尾分别进行插入和移除
实现它们的分别有 ArrayDeque 和 LinkedB1ockingDeaue。
3.6 窃取工作
双端队列使它们自身与一种叫做窃取工作的模式相关联。
在消费者生产者设计中,所有的消费者只共享一个工作队列。
在窃取工作的设计中,每一个消费者都有一个自己的双端队列。
如果一个消费者完成了自己双端队列中的全部工作,它可以偷取其他消费者的双端队列中的末尾任务。
因为工作者线程并不会竞争一个共享的任务队列,所以窃取工作模式比传统的生产者-消费者设计有更佳的可伸缩性。
大多数时候它们访问自己的双端队列,减少竞争。当一个工作者必须要访问另一个队列时,它会从尾部截取,而不是从头部,从而进一步降低对双端队列的争夺。
4. 阻塞和中断的方法 线程会因为几种原因被阻塞或暂停:
等待IO操作结束
等待获得一个锁
等待从Thread.sleep中唤醒
或者是等待另一个线程的计算结果
当一个线程阻塞时,他通常被挂起,并且设置成线程阻塞的某个状态(BLOCKED -- 阻塞、WAITING -- 等待、TIMED_WAITING -- 等待),等到外部事件的发生触发将线程置回(RUNNABLE)状态重新获得调度的机会。
恢复中断状态,避免掩盖中断:
1 2 3 4 5 6 7 8 9 10 11 12 13 14 15 16 17 18 19 20 21 22 23 24 25 import java.util.concurrent.BlockingQueue;public class TaskRunnable implements Runnable { BlockingQueue<Task> queue; @Override public void run () { try { processTask(queue.take()); } catch (InterruptedException e) { Thread.currentThread().interrupt(); } } void processTask (Task task) { } interface Task { } }
5. Synchronizer 5.1 Synchronizer Synchronizer 是一个对象,它根据本身的状态调节线程的控制流。
Synchronizer对象包含:BlockingQueue(阻塞队列),Semaphore(信号量)、Barrier(关卡)、闭锁(Latch)。
5.2 阻塞队列(BlockingQueue)
阻塞队列在容器类中,不仅作为对象的容器,而且能够协调生产者线程和消费者线程之间的控制流。
因为 take 和 put 会保持阻止状态直到队列进入了期望的状态(队列元素不为空,队列还能存放元素)。
5.3 闭锁(Latch) 闭锁是一种 Synchronizer,它可以延迟线程的进度直到线程到达终止状态。
闭锁工作起来就像大门:直到闭锁达到终点状态之前,门一直是关闭的,没有线程能够通过,在终点状态到来的吋候,门开了,允许所有线程都通过。
一但闭锁到达了终点状态,它就不能够再改变状态了,所以它会永远保持敞开状态。
闭锁可以用来确保特定活动直到其他的活动完成后才发生,比如:
确保一个计算不会执行,直到它需要的资源被初始化。
确保一个服务不会开始,直到它依赖的其他服务都已经开始。
等待,直到活动的所有部分都为继续处理作好充分准备,比如在多玩家的游戏中的所有玩家是否都准备就绪。这样的闭锁会在所有玩家准备就绪时,达到终点状态。
FutureTask
Futurerask 可以作为闭锁。
FutureTask 实现了 Future 接口和 Runnable 接口,它等价于一个携带结果的 Runnable,并且有三个状态:等待、运行、完成
完成包括所有计算以任意的方式结束,包括正常结束、取消和异常。一旦 FutureTask 进入完成状态,它会永远停止在这个状态上。
在时序测试中,使用 CountDownLatch 来启动和停止线程
1 2 3 4 5 6 7 8 9 10 11 12 13 14 15 16 17 18 19 20 21 22 23 24 25 26 27 28 29 30 31 32 33 34 35 36 37 38 39 40 41 42 43 44 45 46 47 48 49 50 51 52 53 54 55 56 57 58 import java.util.concurrent.CountDownLatch;public class TestHarness { public long timeTasks (int nThreads, final Runnable task) throws InterruptedException { final CountDownLatch startGate = new CountDownLatch (1 ); final CountDownLatch endGate = new CountDownLatch (nThreads); for (int i = 0 ; i < nThreads; i++) { Thread aThread = new Thread () { @Override public void run () { try { startGate.await(); try { task.run(); } finally { endGate.countDown(); } } catch (InterruptedException ignored) {} } }; aThread.start(); } long start = System.nanoTime(); startGate.countDown(); endGate.await(); long end = System.nanoTime(); return end - start; } }
使用 FutureTask 顶载稍后需要的數据
1 2 3 4 5 6 7 8 9 10 11 12 13 14 15 16 17 18 19 20 21 22 23 24 25 26 27 28 29 30 31 32 33 34 35 36 37 38 39 40 41 42 43 44 45 46 47 48 49 50 51 52 53 54 55 56 57 58 59 60 61 62 63 64 65 66 67 import java.util.concurrent.Callable;import java.util.concurrent.ExecutionException;import java.util.concurrent.FutureTask;public class Preloader { ProductInfo loadProductInfo () throws DataLoadException { return null ; } private final FutureTask<ProductInfo> future = new FutureTask <>(new Callable <ProductInfo>() { @Override public ProductInfo call () throws DataLoadException { return loadProductInfo(); } }); private final Thread thread = new Thread (future); public void start () { thread.start(); } public ProductInfo get () throws DataLoadException, InterruptedException { try { return future.get(); } catch (ExecutionException e) { Throwable cause = e.getCause(); if (cause instanceof DataLoadException) { throw (DataLoadException) cause; } else { throw LaunderThrowable.launderThrowable(cause); } } } interface ProductInfo { } } class DataLoadException extends Exception { }class LaunderThrowable { public static RuntimeException launderThrowable (Throwable throwable) { if (throwable instanceof RuntimeException) { return (RuntimeException) throwable; } else if (throwable instanceof Error) { throw (Error) throwable; } else { throw new IllegalStateException ("Not unchecked" , throwable); } } }
5.4 信号量(Semaphore)
Semaphore的主要方法:
1 2 3 4 void acquire () {} void release () {} int availablePermits () {} boolean hasQueuedThreads () {}
Semaphore中管理着一组虚拟的许可(permit),许可的初始数量可通过构造函数来指定。
在执行操作时可以首先获得许可(只要还有剩余的许可),并在使用以后释放许可。
如果没有许可,那么 acquire() 方法将阻塞直到有许可(或者直到被中断、或者操作超时)。
计算信号量的一种简化形式是二元信号量,即初始值为1的Semaphore。
二元信号量可以用做互斥体(mutex),并具备不可重入的加锁语义。
使用信号量来约束容器:
1 2 3 4 5 6 7 8 9 10 11 12 13 14 15 16 17 18 19 20 21 22 23 24 25 26 27 28 29 30 31 32 33 34 35 36 37 38 39 40 41 42 43 import java.util.Collections;import java.util.HashSet;import java.util.Set;import java.util.concurrent.Semaphore;public class BoundedHashSet <T> { private final Set<T> set; private final Semaphore semaphore; public BoundedHashSet (int bound) { this .set = Collections.synchronizedSet(new HashSet <>()); semaphore = new Semaphore (bound); } public boolean add (T obj) throws InterruptedException { semaphore.acquire(); boolean wasAdded = false ; try { wasAdded = set.add(obj); return wasAdded; } finally { if (!wasAdded) { semaphore.release(); } } } public boolean remove (Object obj) { boolean wasRemoved = set.remove(obj); if (wasRemoved) { semaphore.release(); } return wasRemoved; } }
5.5 关卡(Barrier) 关卡类似于闭锁,它们都能够阻塞一组线程,直到某些事件发生。
关卡与闭锁关键的不同在于,所有线程必须同时到达关卡点,才能继续处理。闭锁等待的是事件;关卡等待的是其他线程。
CyclicBarrier
CyclicBarrier 的字面意思是可循环使用(Cyclic)的屏障(Barrier)。它要做的事情是,让一组线程到达一个屏障(关卡点)时被阻塞,直到最后一个线程到达屏障时,屏障才会开门,所有被屏障拦截的线程才会继续干活。
当线程到达关卡点时,调用await()方法,线程会被阻塞,直到所有的线程都到达关卡点。
如果所有的线程都到达了关卡点,关卡就会被突破,这样所有的线程都被释放,关卡会重置以备下一次使用。
如果对await()的方法调用超时,或者阻塞中的线程被中断,那么关卡就被认为是失败的,所有调用await()未完成的线程,都通过BrokenBarrierException终止。
CyclicBarrier默认的构造方法是CyclicBarrier(int parties),其参数表示屏障拦截的线程数量,每个线程调用await()方法告诉CyclicBarrier我已经到达了屏障,然后当前线程被阻塞。
在一个细胞的自动系统中用 CyclicBarrier 协调计算:
1 2 3 4 5 6 7 8 9 10 11 12 13 14 15 16 17 18 19 20 21 22 23 24 25 26 27 28 29 30 31 32 33 34 35 36 37 38 39 40 41 42 43 44 45 46 47 48 49 50 51 52 53 54 55 56 57 58 59 60 61 62 63 64 65 66 67 68 69 70 71 72 73 74 75 76 77 78 79 80 81 82 83 84 85 86 87 88 89 90 91 92 93 94 95 96 97 98 99 100 101 102 103 104 105 106 107 108 109 110 111 112 113 114 115 116 117 118 119 120 121 122 123 124 125 126 127 128 129 130 131 132 133 import java.util.concurrent.BrokenBarrierException;import java.util.concurrent.CyclicBarrier;public class CellularAutomata { private final Board mainBoard; private final CyclicBarrier barrier; private final Worker[] workers; public CellularAutomata (Board board) { this .mainBoard = board; int count = Runtime.getRuntime().availableProcessors(); this .barrier = new CyclicBarrier (count, new Runnable () { @Override public void run () { mainBoard.commitNewValues(); } }); this .workers = new Worker [count]; for (int i = 0 ; i < count; i++) { workers[i] = new Worker (mainBoard.getSubBoard(count, i)); } } private class Worker implements Runnable { private final Board board; public Worker (Board board) { this .board = board; } @Override public void run () { while (!board.hasConverged()) { for (int x = 0 ; x < board.getMaxX(); x++) { for (int y = 0 ; y < board.getMaxY(); y++) { board.setNewValue(x, y, computeValue(x, y)); } } try { barrier.await(); } catch (InterruptedException | BrokenBarrierException ex) { return ; } } } private int computeValue (int x, int y) { return 0 ; } } public void start () { for (Worker worker : workers) { new Thread (worker).start(); } mainBoard.waitForConvergence(); } interface Board { int getMaxX () ; int getMaxY () ; int getValue (int x, int y) ; int setNewValue (int x, int y, int value) ; void commitNewValues () ; boolean hasConverged () ; void waitForConvergence () ; Board getSubBoard (int numPartitions, int index) ; } }
6. 建立高效、可伸缩的高速缓存 6.1 为计算结果建立高效、可伸缩的高速缓存 几乎所有的服务器应用都会使用某种形式的缓存。
重用之前的计算结果能降低延迟,提高吞吐量,但却要消耗更多内存。
看上去简单的缓存,可能会将性能瓶颈转变成伸缩性瓶颈,即使缓存是用来提高单线程性能的。
6.2 使用 HashMap 和同步 来初始化缓存 1 2 3 4 5 6 7 8 9 10 11 12 13 14 15 16 17 18 19 20 21 22 23 24 25 26 27 28 29 30 31 32 33 34 35 36 37 38 39 40 41 42 43 import net.jcip.annotations.GuardedBy;import java.math.BigInteger;import java.util.HashMap;import java.util.Map;public class Memoizer1 <A, V> implements Computable <A, V> { @GuardedBy("this") private final Map<A, V> cache = new HashMap <>(); private final Computable<A, V> computer; public Memoizer1 (Computable<A, V> computer) { this .computer = computer; } @Override public synchronized V compute (A arg) throws InterruptedException { V result = cache.get(arg); if (result == null ) { result = computer.compute(arg); cache.put(arg, result); } return result; } } interface Computable <A, V> { V compute (A arg) throws InterruptedException; } class ExpensiveFunction implements Computable <String, BigInteger> { @Override public BigInteger compute (String arg) { return new BigInteger (arg); } }
Memorizer1 将 Computable 实现类的计算结果缓存在Map<A, V> cache。
因为HashMap不是线程安全的,为了保证并发性,Memorizer1用了个很保守的方法,对整个compute方法进行同步。这导致了Memorizer1会有很明显的可伸缩性问题。
当有很多线程调用compute方法,就会出现类似下图的情况(并发性能弱):
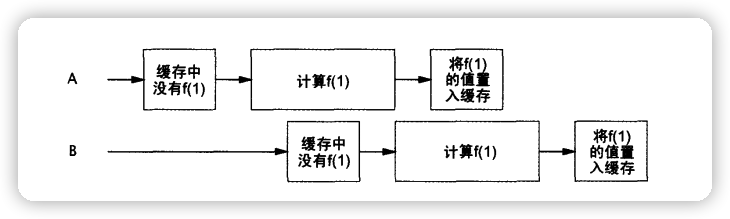
6.3 用 ConcurrentHashMap 来初始化缓存 1 2 3 4 5 6 7 8 9 10 11 12 13 14 15 16 17 18 19 20 21 22 23 24 25 26 27 import java.util.Map;import java.util.concurrent.ConcurrentHashMap;public class Memoizer2 <A, V> implements Computable <A, V> { private final Map<A, V> cache = new ConcurrentHashMap <>(); private final Computable<A, V> computer; public Memoizer2 (Computable<A, V> computer) { this .computer = computer; } @Override public V compute (A arg) throws InterruptedException { V result = cache.get(arg); if (result == null ) { result = computer.compute(arg); cache.put(arg, result); } return result; } }
ConcurrentHashMap为了提高本身的并发能力,在内部采用了一个叫做Segment的结构,一个Segment其实就是一个类HashTable的结构,Segment内部维护了一个链表数组。该结构的带来的副作用是Hash的过程要比普通的HashMap要长,但是带来的好处是写操作的时候可以只对元素所在的Segment进行加锁即可,不会影响到其他的Segment。ConcurrentHashMap让锁的粒度更精细一些,并发性能更好。
当两个线程同时计算同一个值,它们并不知道有其它线程在做同一的事,存在着资源被浪费的可能。如下图:
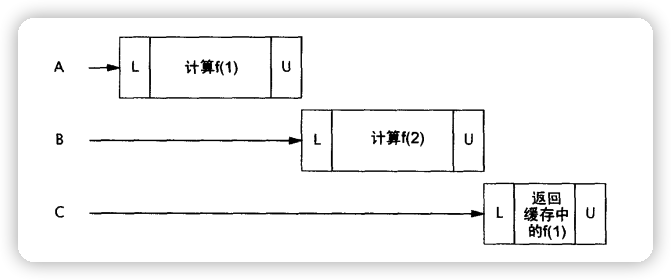
6.4 使用 ConcurrentHashMap+FutureTask 来初始化缓存
闭锁是可以延迟线程的进度直到线程到达终止状态。Futurerask 可以作为闭锁。闭锁工作起来就像大门:直到闭锁达到终点状态之前,门一直是关闭的,没有线程能够通过,在终点状态到来的吋候,门开了,允许所有线程都通过。
1 2 3 4 5 6 7 8 9 10 11 12 13 14 15 16 17 18 19 20 21 22 23 24 25 26 27 28 29 30 31 32 33 34 35 36 37 38 39 40 41 42 43 44 45 import java.util.Map;import java.util.concurrent.Callable;import java.util.concurrent.ConcurrentHashMap;import java.util.concurrent.ExecutionException;import java.util.concurrent.Future;import java.util.concurrent.FutureTask;public class Memoizer3 <A, V> implements Computable <A, V> { private final Map<A, Future<V>> cache = new ConcurrentHashMap <>(); private final Computable<A, V> computer; public Memoizer3 (Computable<A, V> computer) { this .computer = computer; } @Override public V compute (final A arg) throws InterruptedException { Future<V> cacheFuture = cache.get(arg); if (cacheFuture == null ) { Callable<V> eval = new Callable <V>() { @Override public V call () throws InterruptedException { return computer.compute(arg); } }; FutureTask<V> task = new FutureTask <>(eval); cacheFuture = task; cache.put(arg, task); task.run(); } try { return cacheFuture.get(); } catch (ExecutionException e) { throw LaunderThrowable.launderThrowable(e.getCause()); } } }
Memorizer3 缓存的不是计算的结果,而是进行运算的 Future<V> cacheFuture。
因此首先检查有没有执行该任务的FutureTask
如果有执行该任务的FutureTask,则直接获得FutureTask
如果没有执行该任务的FutureTask,则创建一个FutureTask进行运算,后续进了的同样的运算可以直接拿到结果或者等待运算完成获得结果。
1
2
if (cacheFuture == null ) { ... }return cacheFuture.get();
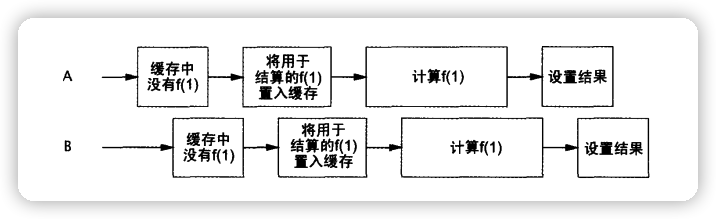
此程序仍然存在一个问题,
当A线程判断没有对应的cache.get(arg);缓存为空(即cache.get(arg)==null)
A线程创建FutureTask,还没进行cache.put(arg, task);操作
1 FutureTask<V> task = new FutureTask <>(eval);
这个时候,B线程判断缓存也是为空的(即cache.get(arg)==null),因为A线程还没进行cache.put(arg, task);操作
B线程创建的FutureTask,就会会把A创建的FutureTask覆盖掉。
如下图:
6.5 ConcurrentHashMap + FutureTask + Map原子操作 来初始化缓存 1 2 3 4 5 6 7 8 9 10 11 12 13 14 15 16 17 18 19 20 21 22 23 24 25 26 27 28 29 30 31 32 33 34 35 36 37 38 39 40 41 42 43 44 45 46 47 48 49 50 51 52 import java.util.concurrent.Callable;import java.util.concurrent.CancellationException;import java.util.concurrent.ConcurrentHashMap;import java.util.concurrent.ConcurrentMap;import java.util.concurrent.ExecutionException;import java.util.concurrent.Future;import java.util.concurrent.FutureTask;public class Memoizer <A, V> implements Computable <A, V> { private final ConcurrentMap<A, Future<V>> cache = new ConcurrentHashMap <>(); private final Computable<A, V> computer; public Memoizer (Computable<A, V> computer) { this .computer = computer; } @Override public V compute (final A arg) throws InterruptedException { while (true ) { Future<V> cacheFuture = cache.get(arg); if (cacheFuture == null ) { Callable<V> eval = new Callable <V>() { @Override public V call () throws InterruptedException { return computer.compute(arg); } }; FutureTask<V> task = new FutureTask <>(eval); cacheFuture = cache.putIfAbsent(arg, task); if (cacheFuture == null ) { cacheFuture = task; task.run(); } } try { return cacheFuture.get(); } catch (CancellationException e) { cache.remove(arg, cacheFuture); } catch (ExecutionException e) { throw LaunderThrowable.launderThrowable(e.getCause()); } } } }
程序做了两点改进:
将 FutureTask<V> 存入 Map 时,使用 ConcurrentHashMap.putIfAbsent() 方法,使得原本复合的插入操作,原子化
使用了 while (true) { ... } ,当在cacheFuture.get()阻塞线程(即Map中,存在FutureTask<V>,等待结果,所以get()方法阻塞),
并抛出CancellationException异常,则会再一次申请一个创建FutureTask的机会。